Christmas Shortbread Cookies Recipe | Festive Holiday Treat
I pulled out my rolling pin and got the dough ready it felt just like holiday magic in the kitchen! I love how simple ingredients come together into something festive and buttery. After baking these christmas shortbread cookies recipe, I found myself sneaking them straight from the tray (just one more!).
Decorating them became a fun little tradition, and the best part? They look like they came from a bakery even though they’re home‑made. I’m excited to share this recipe so you can enjoy the process and the treats as much as I did, and if you’re in the mood for other festive bakes, I recently tried the Apple Fritter Bread Recipe which is equally delightful.
Ingredients
Here are the ingredients and why each one matters:
For the cookies:
- 8 ounces (2 sticks) butter, very soft — real butter gives that rich, melt‑in‑your‑mouth texture.
- ½ cup powdered sugar — this dissolves smoothly and adds sweetness without grittiness.
- 1 teaspoon vanilla extract — adds a warm, familiar flavour that complements the butter.
- 1 ¾ cups all‑purpose flour — the main structure of the cookie.
- ¼ cup cornstarch — this little trick helps keep crisp edges and prevents spreading.
For the mint glaze:
- 2 cups powdered sugar — creates a smooth, bright icing surface.
- 4 tablespoons half‑and‑half (or milk) — thins the icing to the right consistency.
- ¼‑1 teaspoon peppermint extract — gives that festive minty flavour.
For the buttercream piping (decoration):
- 1 tablespoon very soft butter — to make the piping smooth and creamy.
- 1 cup powdered sugar — sweet and easy to pipe.
- 1‑2 tablespoons half‑and‑half (or milk) — for the right consistency.
- ½ teaspoon peppermint extract — to echo that minty glaze.
- 3‑4 drops green food colouring — to pipe the little “Christmas tree” squiggles.
Note: Several servings — this recipe yields about 24 cookies.
Variations
Want to switch things up? Here are some ideas:
- Use dairy‑free butter and plant‑based “milk” instead of regular butter and half‑and‑half for a vegan‑friendly version.
- Replace powdered sugar in the glaze with erythritol‑based powdered substitute for a lower‑sugar option (texture may vary slightly).
- Add festive flavour add‑ins: a pinch of orange extract instead of peppermint, or swirl in lemon zest to brighten the flavour.
- Swap the green food colouring for red or gold to decorate different shapes (stars, bells), or add a sprinkle of festive edible glitter for extra sparkle.
For a fun dessert table combo, you can also enjoy a slice of Moist Oreo Pound Cake Recipe alongside your shortbread cookies.

Cooking Time
Here’s the breakdown of how long everything takes:
- Prep Time: 45 minutes
- Cooking Time: 12 minutes
- Total Time: 57 minutes
Equipment you need
Here’s what I used and why:
- Mixing bowl – to combine butter, sugar and flour easily
- Wooden spoon or sturdy spatula – because no mixer is needed, makes cleanup easier
- Rolling pin – for rolling dough to an even thickness
- Cookie cutters – to shape your cookies into festive designs
- Baking sheet lined with parchment – prevents sticking and makes cleanup quick
- Wire rack – to cool cookies completely before decorating
How to Make Christmas Shortbread Cookies?
Prepare the dough
I started by placing the very soft butter in a bowl and stirring it until smooth. Then I added the powdered sugar and vanilla, mixing by hand until fluffy. After that I incorporated the flour and cornstarch until the dough came together.
Roll, cut and chill
Next I turned out the dough onto a lightly floured surface, formed a ball and flattened it into a disk. Then I rolled it to roughly ⅜‑inch thickness (a helper tip: use adjustable rolling rings) and used cookie cutters for festive shapes. I transferred the shapes to sheet pans, then chilled them in the refrigerator for at least one hour so that they keep their shape when baking.
Bake and decorate
Preheat your oven (about 350 °F / 175 °C) and bake the chilled cut‑outs for about 12‑14 minutes until the edges just begin to turn golden. Then let them cool completely on a wire rack.
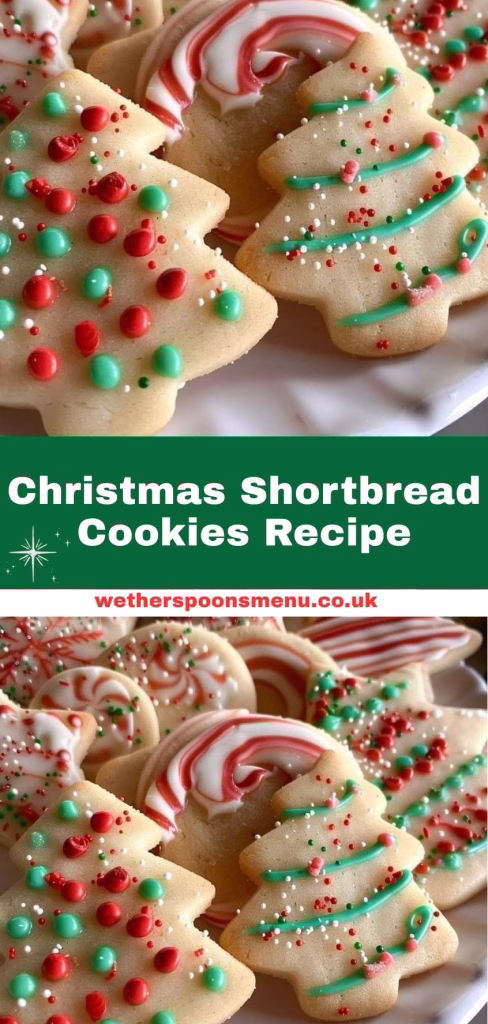
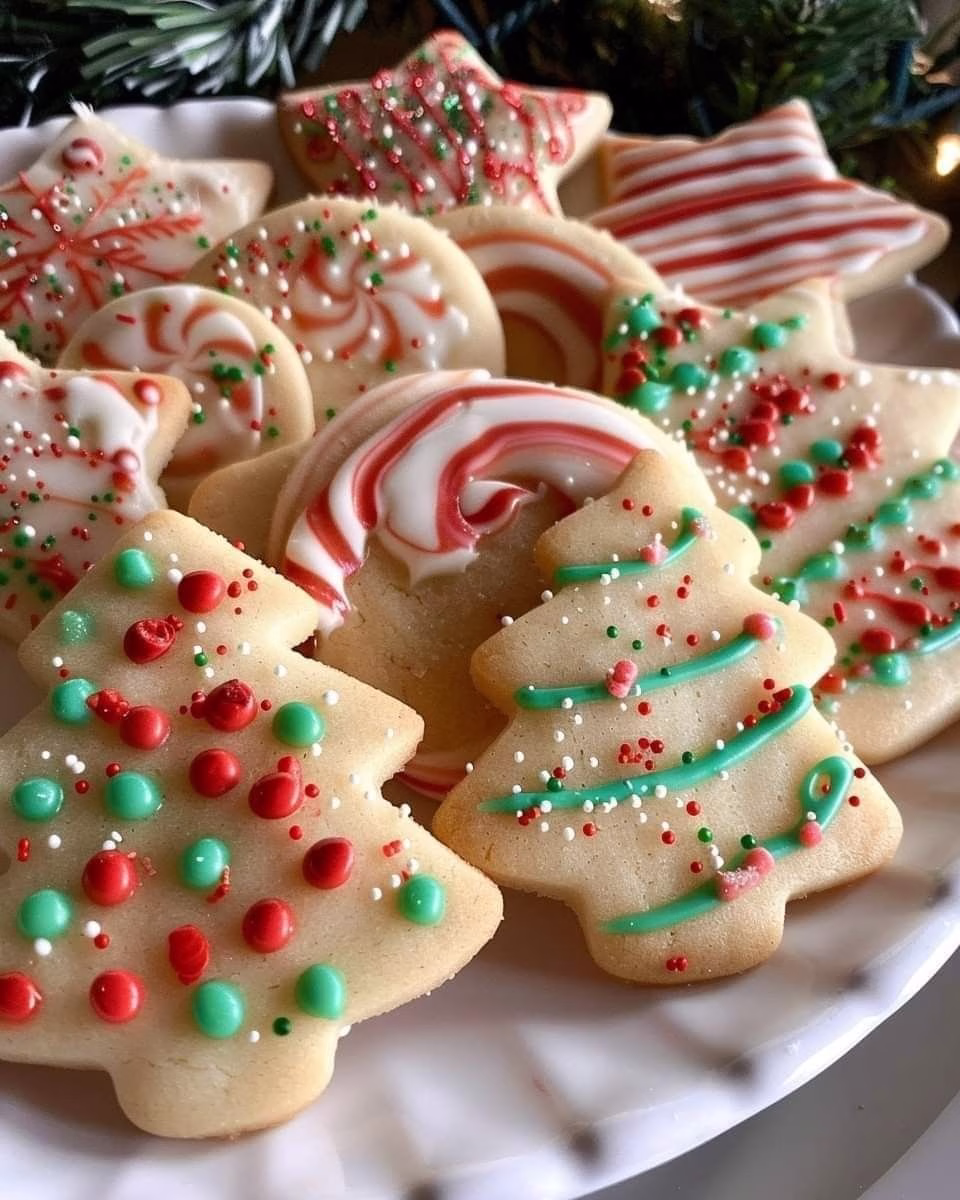
While they were cooling, I prepared the glaze and buttercream piping. I dipped the cookies top‑side down into the glaze (letting excess drip), flipped them, then used a piping bag to draw little green tree squiggles and added sprinkles (nonpareils) for extra charm.
Additional Tips for Making this Recipe Better
Here are some personal tips I found helpful when baking:
- I made sure the butter was very soft before mixing (even popped it in the microwave at 10% power for 20‑30 seconds) — it made mixing easier and the dough smoother.
- I rolled the dough to a consistent thickness (~⅜‑inch) using guides on my rolling pin — this helped cookies bake evenly and look uniform.
- I chilled the cookie dough cut‑outs well before baking — this kept the cookies from spreading and ensured crisp, well‑defined shapes.
- I decorated in stages: first dipped the cookies into glaze, then once dry I went back for piping and sprinkles — it made the process less messy and the designs cleaner.
- I stored the decorated cookies in layers separated by parchment to prevent smudging — especially helpful if gifting them.
How to Serve Christmas Shortbread Cookies?
Once the cookies are decorated, the presentation makes them even more festive. Arrange them on a platter with a doily or a holiday‑themed plate. Stack a few with parchment between each layer if you’re serving family or guests.
Garnish with a sprig of fresh rosemary or a few crushed candy cane pieces for added colour and texture. If you’re giving them as gifts, wrap a bundle in clear cellophane, tie with a bright ribbon and add a little tag. The look is as delightful as the taste.
Nutritional Information
Here’s a rough idea of what each cookie delivers:
- Calories: ~150‑160 kcal per cookie
- Protein: ~1 g
- Carbohydrates: ~22 g
- Fat: ~8 g
Make Ahead and Storage
Storage
After baking and decorating, I let the cookies dry completely and then stored them in an airtight container at room temperature. They stayed crisp and fresh for about 5‑7 days when kept cool and dry.
Freezing
If you want to make ahead, you can freeze the baked, undecorated cookies (wrapped tightly) for up to 2‑3 months. Thaw them at room temperature, then decorate once thawed for best results.
Reheating
These cookies are best eaten as-is; they don’t need reheating. If you want them slightly warm, pop them into a 200 °F (95 °C) oven for 2‑3 minutes, then let them cool for a moment before decorating.
Why You’ll Love This Recipe?
Here are some reasons I fell in love with this recipe and why you will too:
- Simplicity and few ingredients: Just butter, sugar, flour and cornstarch for the dough — nothing complicated.
- Great flavour and texture: Buttery, crisp edges, melt‑in‑your‑mouth interior — it’s just so satisfying.
- Decorative but doable: The easy “dip‑and‑flip” glazing plus piping gives beautiful results without fancy skills.
- Versatility: You can switch extracts, shapes, and colours to suit different holiday themes or dietary needs.
- Make‑ahead friendly: You can bake or freeze ahead and decorate later — perfect for busy holiday prepping.
Christmas Shortbread Cookies Recipe
Ingredients
Method
- I started by placing the very soft butter in a bowl and stirring it until smooth. Then I added the powdered sugar and vanilla, mixing by hand until fluffy. After that I incorporated the flour and cornstarch until the dough came together.
- Next I turned out the dough onto a lightly floured surface, formed a ball and flattened it into a disk. Then I rolled it to roughly ⅜‑inch thickness (a helper tip: use adjustable rolling rings) and used cookie cutters for festive shapes. I transferred the shapes to sheet pans, then chilled them in the refrigerator for at least one hour so that they keep their shape when baking.
- Preheat your oven (about 350 °F / 175 °C) and bake the chilled cut‑outs for about 12‑14 minutes until the edges just begin to turn golden. Then let them cool completely on a wire rack. While they were cooling, I prepared the glaze and buttercream piping. I dipped the cookies top‑side down into the glaze (letting excess drip), flipped them, then used a piping bag to draw little green tree squiggles and added sprinkles (nonpareils) for extra charm.
Notes
- I made sure the butter was very soft before mixing (even popped it in the microwave at 10% power for 20‑30 seconds) — it made mixing easier and the dough smoother.
- I rolled the dough to a consistent thickness (~⅜‑inch) using guides on my rolling pin — this helped cookies bake evenly and look uniform.
- I chilled the cookie dough cut‑outs well before baking — this kept the cookies from spreading and ensured crisp, well‑defined shapes.
- I decorated in stages: first dipped the cookies into glaze, then once dry I went back for piping and sprinkles — it made the process less messy and the designs cleaner.
- I stored the decorated cookies in layers separated by parchment to prevent smudging — especially helpful if gifting them.