I have made countless versions of sweet and sour chicken over the years, but this baked recipe is the one I always come back to.
It’s a total game-changer, giving you that crispy, restaurant-quality texture without all the hassle of deep-frying. The sauce caramelizes perfectly in the oven, clinging to every piece of chicken.
Just like when I first made my Hawaiian grilled cheese sandwich recipe and knew it was special, this dish instantly became a household favorite. My family asks for this dish at least once a week, and honestly, I’m always happy to make it. It’s just that good and surprisingly simple to put together.

Ingredients
This recipe relies on a few simple pantry staples to create a dish that tastes like it came from your favorite takeout spot. Here’s what you’ll need to get started.
For the Chicken:
- 3-4 boneless, skinless chicken breasts (about 2 pounds) – Cut into uniform 1-inch pieces to ensure they cook evenly.
- Salt and pepper – For seasoning the chicken before coating.
- 1 cup cornstarch – This is the secret to a light, crispy coating that frying can’t replicate. It’s much better than flour.
- 2 large eggs, beaten – This acts as the binder that helps the coating stick to the chicken.
- ¼ cup canola, vegetable, or coconut oil – For pan-searing the chicken. Use a neutral oil with a high smoke point.
For the Sauce:
- ½ to ¾ cup granulated sugar – You can adjust this based on how sweet you prefer your sauce. I find 1/2 cup is a good starting point.
- 4 tablespoons ketchup – Provides a tangy, sweet base. A quality brand like Heinz works best for consistent flavor.
- ½ cup apple cider vinegar – This gives the sauce its signature “sour” tang. Don’t worry, the strong smell bakes off!
- 1 tablespoon soy sauce – Adds a savory, umami depth to balance the sweetness.
- 1 teaspoon garlic salt – A simple way to infuse a savory, garlicky flavor throughout the sauce.
Note: The ingredient quantities listed will create approximately 6 servings.
Variations
One of the best things about this recipe is how easily you can adapt it to your taste or dietary needs. Just like you might customize a spinach ricotta stuffed shells recipe to suit your preferences, there are plenty of ways to make this sweet and sour chicken your own.
- Sugar-Free Option: For a lower-sugar version, you can substitute the granulated sugar with a zero-calorie sweetener like erythritol or use honey or maple syrup, though this will slightly alter the flavor. Many have had success reducing the sugar to 1/2 cup without any issues.
- Different Vinegars: If you don’t have apple cider vinegar, rice vinegar is an excellent substitute for a milder, slightly sweeter taste. White vinegar also works in a pinch.
- Add Vegetables: Feel free to toss in some chopped bell peppers, onions, or pineapple chunks with the chicken before baking. They will roast alongside the chicken and soak up the delicious sauce.
- Gluten-Free: The recipe is naturally gluten-free if you use a gluten-free soy sauce or tamari. Cornstarch is a gluten-free ingredient, making this an easy adaptation.
- Spice It Up: For a little heat, add a teaspoon of sriracha or a pinch of red pepper flakes to the sauce mixture.
Cooking Time
- Prep Time: 1 hour
- Cook Time: 1 hour
- Total Time: 2 hours
Equipment You Need
- 9×13-inch baking dish: This provides enough space for the chicken to bake in a single layer, which is crucial for even cooking.
- Large skillet: A nonstick skillet is ideal for browning the chicken with less oil.
- Ziploc bag (gallon-sized): This is the easiest, mess-free way to coat the chicken pieces in cornstarch.
- Shallow pie plate or bowl: Perfect for holding the egg wash for easy dipping.
- Medium bowl: For whisking together all the sauce ingredients.
- Tongs or a fork: Essential for turning the chicken pieces as they brown in the skillet.
How to Make Baked Sweet and Sour Chicken
This process might seem unusual, but trust the steps. Searing the chicken first and then baking it in the sauce creates a wonderfully crisp exterior and a juicy interior.
Prepare the Oven and Chicken
First, preheat your oven to 325°F (163°C). While it heats up, cut the chicken breasts into uniform 1-inch pieces. Place the chicken pieces into a gallon-sized Ziploc bag, season lightly with salt and pepper, add the cornstarch, seal the bag, and shake it well until every piece is evenly coated.
Coat the Chicken
Next, whisk the two large eggs in a shallow dish or pie plate. Heat your oil in a large skillet over medium-high heat until it’s shimmering. Working in batches, dip the cornstarch-coated chicken pieces into the egg wash, letting any excess drip off before carefully placing them into the hot skillet.
Brown and Arrange the Chicken
Sear the chicken for about 20-30 seconds on each side, just until a golden-brown crust forms. The chicken will not be cooked through at this stage. As the pieces are browned, transfer them to a 9×13-inch baking dish and arrange them in a single layer.
Make the Sauce and Bake
In a medium bowl, whisk together the sugar, ketchup, apple cider vinegar, soy sauce, and garlic salt until smooth. Pour this sauce evenly over the chicken in the baking dish. Bake for one hour, turning the chicken pieces once or twice during cooking to ensure they are all nicely coated as the sauce thickens and caramelizes.
Additional Tips for Making This Recipe Better
Over the many times I’ve made this dish, I’ve picked up a few tricks that really elevate it.
- I cannot stress this enough: make sure your oil is hot before adding the chicken. If it doesn’t sizzle immediately, the chicken will absorb too much oil and become greasy instead of crispy.
- When turning the chicken during baking, I use a small spatula around the 30-minute mark and again 15 minutes before it’s done. This helps prevent the sauce from burning on the bottom and ensures every piece gets that glossy glaze.
- Don’t overcrowd the skillet while browning. Working in two or three batches gives the chicken pieces enough space to form a proper crust.
- If you love a lot of sauce like my family does, double the sauce recipe. Use half to bake the chicken and simmer the other half on the stovetop for 8-10 minutes until it thickens. It’s perfect for drizzling over the final dish.
How to Serve Baked Sweet and Sour Chicken?
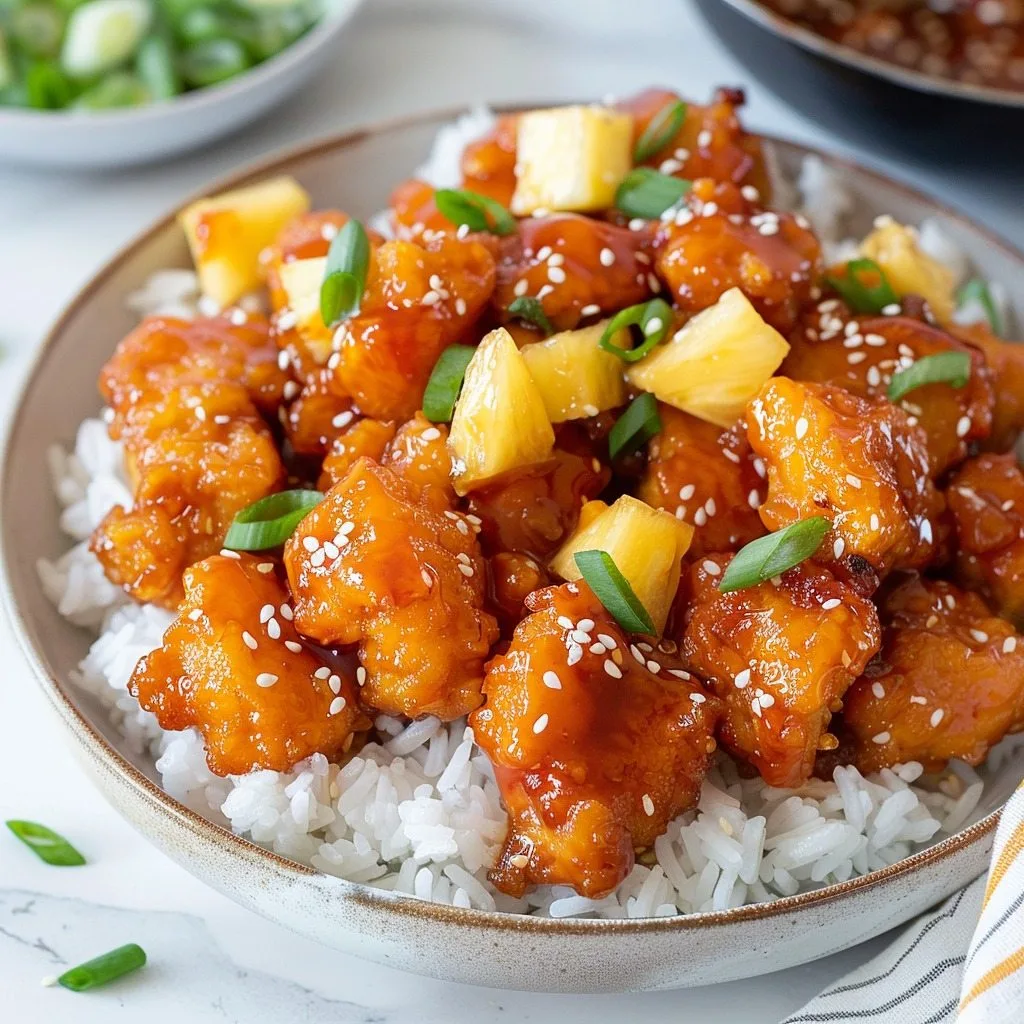
The classic way to serve this dish is over a bed of fluffy, steamed white or brown rice to soak up all the extra sauce. I also love pairing it with a side of steamed broccoli or a colorful stir-fry of mixed vegetables.
If your family loves comforting casseroles as much as mine does, this dish can be served as part of a weeknight spread alongside something hearty like a taco bake casserole recipe.
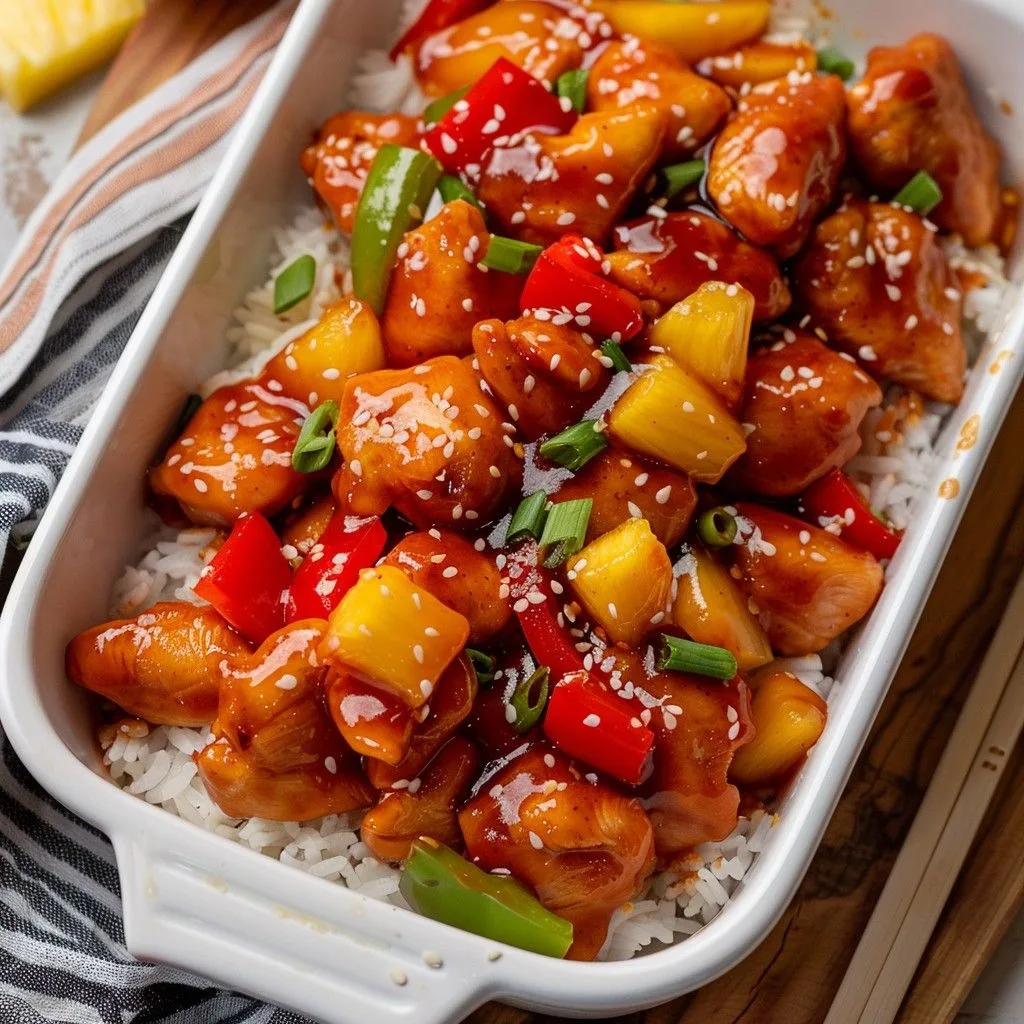
For a fresh and appealing presentation, garnish the chicken with a sprinkle of toasted sesame seeds and some thinly sliced green onions right before serving.
Nutritional Information
Here is an approximate nutritional breakdown per serving. Please note that these values can vary based on the specific ingredients you use.
- Calories: 391kcal
- Protein: 26g
- Carbohydrates: 39g
- Fat: 13g
Make Ahead and Storage
This recipe is great for meal prep and leftovers. Here’s how to handle it.
Restoring: Once cooled, you can store leftover sweet and sour chicken in an airtight container in the refrigerator for up to 3-4 days. The coating will soften upon refrigeration.
Reheating: For the best results, reheat the chicken on a baking sheet in the oven or an air fryer at 350°F (175°C) until warmed through. This will help crisp up the coating again. Microwaving works too, but the chicken will remain soft.
Freezing: You can freeze the cooked chicken for up to 3 months. Let it cool completely, then place it in a freezer-safe bag or container. Thaw it in the refrigerator overnight before reheating.
Why You’ll Love This Recipe
There are so many reasons this baked sweet and sour chicken has become a staple in kitchens everywhere. Here are just a few:
- Easier and Healthier: Baking the chicken instead of deep-frying makes it a lighter option and creates far less mess in the kitchen, giving you a restaurant-worthy meal without the cleanup.
- Incredibly Delicious Flavor: The sauce achieves the perfect balance of sweet and tangy, and it caramelizes beautifully in the oven to create an irresistible sticky glaze that coats every piece of chicken.
- Perfectly Crispy Texture: The unique cornstarch-then-egg coating method delivers a surprisingly crispy crust that holds up well, even after being drenched in sauce and baked for an hour.
- Highly Adaptable: This recipe is easy to customize. You can adjust the sweetness, swap the vinegar, or throw in your favorite vegetables to make it your own. It’s a great base for experimentation.
Baked Sweet and Sour Chicken Recipe
Ingredients
Method
- First, preheat your oven to 325°F (163°C). While it heats up, cut the chicken breasts into uniform 1-inch pieces. Place the chicken pieces into a gallon-sized Ziploc bag, season lightly with salt and pepper, add the cornstarch, seal the bag, and shake it well until every piece is evenly coated.
- Next, whisk the two large eggs in a shallow dish or pie plate. Heat your oil in a large skillet over medium-high heat until it’s shimmering. Working in batches, dip the cornstarch-coated chicken pieces into the egg wash, letting any excess drip off before carefully placing them into the hot skillet.
- Sear the chicken for about 20-30 seconds on each side, just until a golden-brown crust forms. The chicken will not be cooked through at this stage. As the pieces are browned, transfer them to a 9×13-inch baking dish and arrange them in a single layer.
- In a medium bowl, whisk together the sugar, ketchup, apple cider vinegar, soy sauce, and garlic salt until smooth. Pour this sauce evenly over the chicken in the baking dish. Bake for one hour, turning the chicken pieces once or twice during cooking to ensure they are all nicely coated as the sauce thickens and caramelizes.
Notes
- I cannot stress this enough: make sure your oil is hot before adding the chicken. If it doesn’t sizzle immediately, the chicken will absorb too much oil and become greasy instead of crispy.
- When turning the chicken during baking, I use a small spatula around the 30-minute mark and again 15 minutes before it’s done. This helps prevent the sauce from burning on the bottom and ensures every piece gets that glossy glaze.
- Don’t overcrowd the skillet while browning. Working in two or three batches gives the chicken pieces enough space to form a proper crust.
- If you love a lot of sauce like my family does, double the sauce recipe. Use half to bake the chicken and simmer the other half on the stovetop for 8-10 minutes until it thickens. It’s perfect for drizzling over the final dish.