Christmas Fudge Recipe | Rich, Creamy Holiday Chocolate Treat
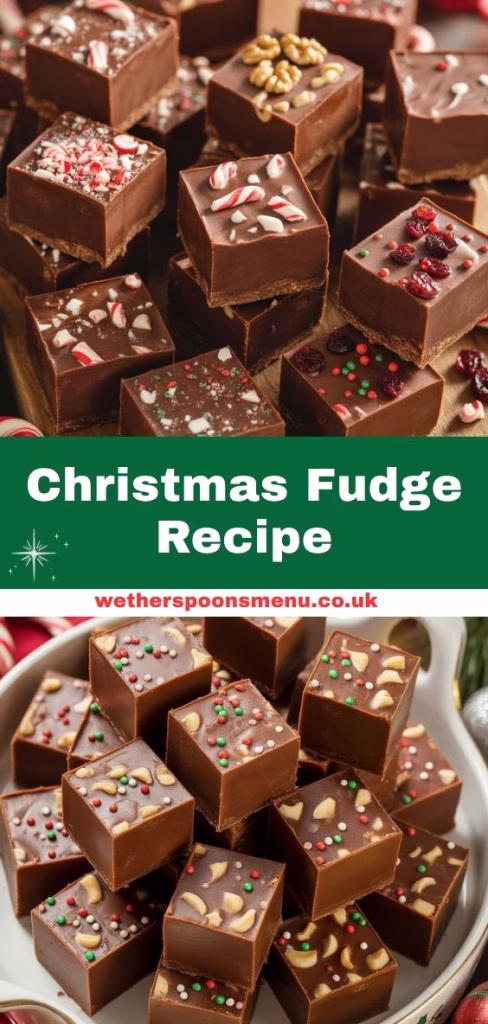
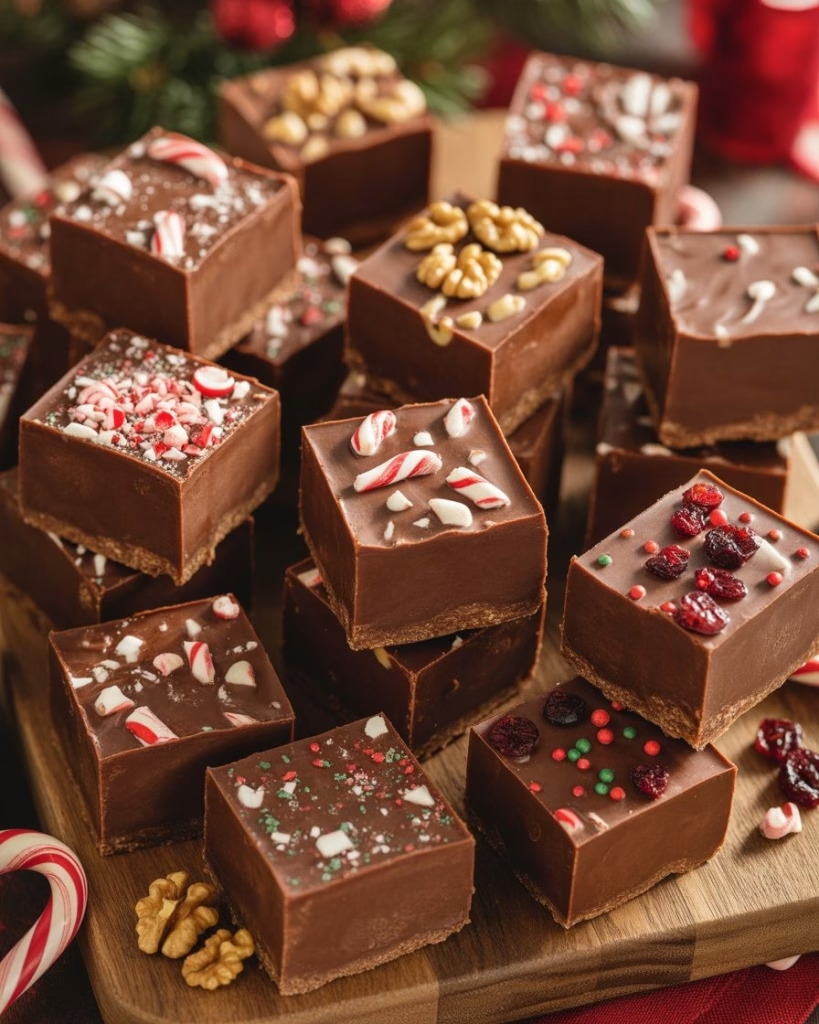
I finally decided to try making my own batch of Christmas Fudge Recipe this holiday season, and let me tell you—it was magical. As I stirred the silky melted chocolate with creamy condensed milk, the aroma alone made my kitchen smell like Christmas morning. Once chilled, each square turned out perfectly smooth, rich, and melt-in-your-mouth delicious.
It felt so rewarding to slice them up and wrap them for gifts, knowing they looked as good as they tasted. This simple no-bake fudge recipe is officially my new favorite for the holidays, and if you enjoy making festive desserts, you might also love these lemon bars for another sweet holiday treat!
Ingredients
Here’s everything you’ll need to make this irresistible fudge, along with some tips to get it just right:
- 14 oz sweetened condensed milk – This thick, rich milk is what gives the fudge its creamy, smooth texture and sweetness. Avoid evaporated milk—it won’t set properly.
- 6 oz semi-sweet chocolate chips – The darker chocolate balances the sweetness perfectly and gives that rich base layer. Always use good-quality chocolate for the best flavor.
- 6 oz white chocolate chips – The white chocolate layer adds contrast and sweetness, plus a festive look that feels perfect for Christmas.
- 2 teaspoons vanilla extract – A little vanilla brings warmth and enhances the chocolate’s flavor beautifully.
- 2 tablespoons of Christmas sprinkles – These colorful sprinkles give the fudge that fun, festive touch and make each bite feel special.
Note: This recipe makes around 36 small fudge squares—perfect for sharing or gifting!
Variations
You can easily customize this recipe to suit your taste or dietary needs. Here are a few ideas:
- Dairy-free: Swap the sweetened condensed milk for a coconut-based dairy-free version, and use dairy-free chocolate chips. It still turns out creamy and delicious.
- Sugar-free: Opt for sugar-free chocolate chips and a reduced-sugar condensed milk alternative for a lighter version. Chill well, as sugar-free fudge can soften faster.
- Flavor add-ins: Add a few drops of peppermint extract for a minty twist or stir in crushed candy canes for crunch. You can also mix in chopped pecans or walnuts for a nutty version.
- Color variations: Match your fudge to your celebration theme by using gold, silver, or blue sprinkles instead of traditional red and green.
Cooking Time
This is one of the best parts—it’s quick and effortless!
- Prep Time: 10 minutes
- Cooking Time: 0 minutes (just melting and mixing)
- Total Time: About 10 minutes, plus chilling time
Equipment You Need
You don’t need fancy tools to make this fudge. Here’s what helps:
- Medium bowl: For melting and mixing the chocolate with the condensed milk.
- Spatula: Perfect for stirring the fudge mixture and spreading it evenly in the pan.
- 8×8-inch baking pan: The ideal size to get nice, thick squares. Line it with parchment paper for easy removal.
- Refrigerator: Helps the fudge set firm and slice beautifully.
How to Make a Christmas Fudge Recipe?
Let’s break it down step-by-step. It’s super simple and perfect even for beginners!
Prepare the pan
Start by lining your 8×8-inch baking pan with parchment paper, leaving a little overhang on the sides. This makes lifting the fudge out much easier once it’s chilled. Lightly grease it if you’d like extra insurance against sticking.
Make the bottom layer
In a microwave-safe bowl, combine the semi-sweet chocolate chips and half of the sweetened condensed milk. Heat in 30-second bursts, stirring after each until smooth. Add a teaspoon of vanilla extract and stir again. Pour this rich chocolate layer into your prepared pan and spread evenly.
Make the top layer
Now, repeat the same process with the white chocolate chips and the remaining condensed milk. Melt and stir until silky, then add in the rest of the vanilla extract. Pour the white chocolate mixture over the semi-sweet layer and gently spread to cover evenly.
Add the sprinkles
While the top is still soft, scatter the Christmas sprinkles evenly over the surface. Gently press them in with the back of a spoon so they stick nicely once set.
Chill and slice
Place the pan in the refrigerator and let it chill for at least one hour—or until the fudge is firm. Once set, lift it out using the parchment paper and cut into small squares with a sharp knife. Keep the pieces small—this fudge is rich!
Additional Tips for Making this Recipe Better
After making this fudge myself, here are a few things I learned that make all the difference:
- Have everything ready before you start melting—chocolate can harden fast, so you’ll want to move quickly.
- Use fresh chocolate chips. Older or opened chocolate sometimes melts unevenly, giving a grainy texture.
- Don’t overheat the chocolate. Short bursts in the microwave (with stirring) prevent it from seizing.
- Press the sprinkles in right after spreading the top layer—if you wait too long, they won’t stick well.
- Chill it fully before slicing. I like to wait at least two hours for the cleanest cuts and firmest texture.
How to Serve Christmas Fudge Recipe?
The presentation makes this fudge even more festive! Arrange the squares on a bright red or gold serving platter, or package them in small gift boxes lined with parchment. You can also place individual pieces in mini cupcake liners for a polished look. Dust the tops lightly with edible glitter or crushed candy canes if you want extra sparkle. Serve them cold alongside coffee, hot chocolate, or even a cozy peanut butter cream cold brew for a perfect winter treat.

Nutritional Information
Here’s a quick look at the nutrition per serving:
- Calories: Around 89 kcal per piece
- Protein: Approximately 1 g
- Carbohydrates: About 11 g
- Fat: Roughly 4 g
A small square goes a long way—it’s rich, creamy, and perfectly sweet.
Make Ahead and Storage
Storage guidelines
Keep the fudge in an airtight container in the refrigerator for up to three weeks. It holds its shape best when cold and stays fresh and creamy.
Freezing
This fudge freezes really well! Place the pieces in a sealed container or wrap them tightly in plastic wrap and foil. They’ll keep for up to three months. When ready to serve, thaw in the refrigerator overnight.
Restoring / Reheating
No reheating is necessary since fudge is best served chilled. If it softens a little at room temperature, just pop it back in the fridge for a few minutes to firm it up again.
Why You’ll Love This Recipe
If you’re still wondering whether to try this fudge, here are a few reasons why it’s worth it:
- So easy to make: No baking, no thermometer, and barely any cleanup. You can whip it up in minutes!
- Perfectly festive: The two-tone chocolate layers and colorful sprinkles make it a showstopper on any dessert table.
- Great for gifting: I love cutting small squares, boxing them up, and giving them as edible gifts. They travel well and stay fresh for weeks.
- Customizable flavors: You can tweak it with peppermint, caramel, or nutty add-ins to make it your own.
- Kid-approved: It’s sweet, smooth, and fun to make—kids can help add the sprinkles or stir the melted chocolate.
This Christmas Fudge has quickly become my go-to recipe for the holiday season. It’s rich, beautiful, and unbelievably simple to make. Whether you serve it at a Christmas party, give it to friends, or enjoy it by the fireplace with a hot drink, it’s guaranteed to bring smiles all around.

Christmas Fudge Recipe
Ingredients
Method
- Start by lining your 8×8-inch baking pan with parchment paper, leaving a little overhang on the sides. This makes lifting the fudge out much easier once it’s chilled. Lightly grease it if you’d like extra insurance against sticking.
- In a microwave-safe bowl, combine the semi-sweet chocolate chips and half of the sweetened condensed milk. Heat in 30-second bursts, stirring after each until smooth. Add a teaspoon of vanilla extract and stir again. Pour this rich chocolate layer into your prepared pan and spread evenly.
- Now, repeat the same process with the white chocolate chips and the remaining condensed milk. Melt and stir until silky, then add in the rest of the vanilla extract. Pour the white chocolate mixture over the semi-sweet layer and gently spread to cover evenly.
- While the top is still soft, scatter the Christmas sprinkles evenly over the surface. Gently press them in with the back of a spoon so they stick nicely once set.
- Place the pan in the refrigerator and let it chill for at least one hour—or until the fudge is firm. Once set, lift it out using the parchment paper and cut into small squares with a sharp knife. Keep the pieces small—this fudge is rich!
Notes
- Have everything ready before you start melting—chocolate can harden fast, so you’ll want to move quickly.
- Use fresh chocolate chips. Older or opened chocolate sometimes melts unevenly, giving a grainy texture.
- Don’t overheat the chocolate. Short bursts in the microwave (with stirring) prevent it from seizing.
- Press the sprinkles in right after spreading the top layer—if you wait too long, they won’t stick well.
- Chill it fully before slicing. I like to wait at least two hours for the cleanest cuts and firmest texture.